
Published on May 29, 2026
The objective: To determine which three-dimensional shapes scatters the most light. This will emulate radio waves used in radar and stealth technology.
Have you ever dreamed about becoming invisible? Or about making something else invisible, like the mess all over your room? Invisibility may sound like the stuff of science fiction (remember Star Trek's "Cloaking Device"?), but in reality, military vehicles, like planes and ships, can be made less observable, or even invisible, to different detection methods—like radar, sonar, or infrared sensors—by using stealth technology. In this engineering science fair project, you'll find out how to take invisibility from science fiction to science fact.
The purpose of my project is to find out which 3-D shape is the stealthiest by testing some paper 'test' shapes with light waves.
• To do this project you will need:
• A cardboard box, approximately 17x91/2x141/2 inches (it must be tall enough to fit the width of a standard size piece of paper [81/2inches])
• Black construction paper, enough to fit the entire inside of your cardboard box
• Packaging tape
• Scissors
• LED flashlight, with the on-off switch at the end of the handle
• Lux meter (light meter)
• White paper, 81/2x11 inches (these are for making the 3-D shapes, so you should get more than 5 sheets in case you make mistakes)
• Pencil
• Protractor or Ruler
• Graph paper
1)Cover all the inside surfaces of the box with black construction paper. Use tape to stick the construction paper to the inside of the box. Apply tape only to the back of the sheets of the paper. Use scissors to cut the paper to size, if necessary, and it’s ok to overlap sheets of paper.
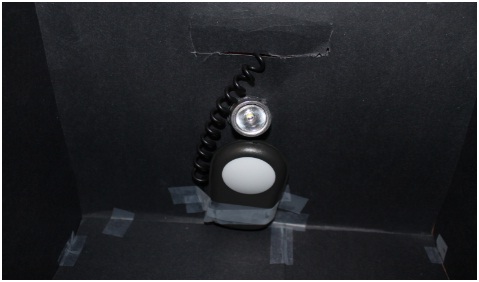
2) Tape the sensor part of the lux meter (the part that receives light) to the inside middle of one end of the box. Position the sensor so that its base is resting on the bottom of the box and its back is taped to the end of the box, in the middle.
3) Let the display part of the lux meter hang outside one corner of the box.
4) Using the tips of the scissors, cut a hole just above the sensor that is just big enough for the flashlight to fit through.
5) Insert the flashlight about halfway through the hole so that the light source is inside the box and the on-off switch is outside of the box. With this arrangement, the sensor and the light source are nearly collocated.
6) Form a cylinder shape out of a white piece of paper by overlapping its short ends slightly and taping them together. The cylinder should be able to stand upright inside the box, without having the lid of the box touch it when the box is closed.
7) Crumple another piece of white paper into a loose ball, then un-crumple it, and make a cylinder out of the crumpled paper.
8) Fold a third piece of paper across its width into fourths, so that it has up-and-down ridges like a “W” when observed from the end. When placed upright, the shape should be able to fit inside the box, without touching the lid when the box is closed.
9) Fold a fourth piece of paper in half, across its width, so that it looks like a “V” when viewed from its end.
10) Place the regular cylinder in the center of the box, so that it is upright and directly in line with the flashlight.
11) Using the pencil, make a mark on the bottom of the box that shows where the edge of the cylinder that is closest to the flashlight is located.
12) Close the box and make sure no light can get through from any openings.
13) Turn on the lux meter.
14) Turn on the flashlight.
15) Read the lux meter display IMMEDIATELY to see how much light is being scattered back from the cylinder.
16) Write down your observations.
17) Repeat steps 10-16 with the rest of the test shapes, placing each of them (in cases of the “W” and “V” shapes, the edge closest to the flashlight) in the spot where you marked with a pencil. Be sure that with the cylinders, you should turn the seam where the paper goes together AWAY from the flashlight.
18) Repeat steps 10-17 two more times, so you have a total of three trials. Be sure to write all of your observations down!

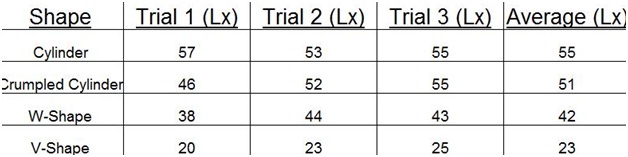

My hypothesis was really wrong. The crumpled cylinder placed third out of all four shapes, with the cylinder in last place and the V-shape in first.
<http://www.askanexpert.com/> Design, Nonstop. Ask an Expert, ©2014 Jurock Publishing
http://www.ask.com/question/how-does-a-pulley-make-work-easier> Ask.com, © 2014 Ask.com
http://www.ehow.com/about_6367453_do-pulleys-make-work-easier_.html>johnmcgee, eHow Contributor. eHow, 1999-2014 Demand Media, Inc.
http://www.youtube.com/watch?v=uv7_4ub76xY&list=UUT22dav7hzRevfME_l8BawQ